Thursday, November 24, 2011

How to Add Signature in Yahoo web Mail

Steps for Add or Changing Signature On your Yahoo Web Mail

1. Open Your Email Account from yahoo's website
2. Open Email Inbox
3. Go to Option Right Top Corner of Window. Like in Picture Below, Highlight with (01)
4. Select Main Option from Option Menu
5. Select Signature Menu from Left side of Windows In Picture Highlight with (2)
6. Enter or Edit Signature that you want. Highlight With (3)

Click on Image to View Large Size


Thanks.


Monday, October 17, 2011

Formatting Documents

Formatting the document is a major feature of Word. There are two ways to format the text.
Formatting is applied on the selected single character or entire document.
Formatting can be done in two ways.
1.Using Formatting Bar
2.Using Format Menu


1. Using Formatting Bar
First of all you selected the text and then apply different formatting tool bar. Some common tools are shown in fig below.


Font Size
Changes the size of selected text and numbers. In the font size box, enter a size. The sizes in the font size box depend on the selected font and active printer.

Font
Changes the font of selected text and numbers. In the font box, Select a font name.


Bold
Makes selected text and numbers bold. If the selection is already bold, Clicking removes bold formatting.

Italic
Makes selected text and numbers italic. If the selection is already italic, Clicking removes italic formatting.

Underline
Underline selected text and numbers.If the selection is already underline, Clicking removes underline formatting.

Align Left
Align the selected text and numbers, or Inline Objects to the left side of the document page.


Center
Centers the selected text, numbers, or inline objects.

Align Right
Align the selected text numbers, or inline objects to the right side of the document page.

Justify
In Microsoft Word and Microsoft Power Point, aligns the selected paragraph to both the left and right margin indents. In Microsoft Excel, breaks the cell contents into multiple lines within the cell and adjust the spacing between words so all lines are as wide as the cell.

Numbering
Add numbers to or removes numbers from selected paragraphs.

Bullets
Add Bullets to or removes bullets from selected paragraphs

Decrease Indent
Indent the selected paragraph to the previous tab stop or indent contents of selected items to the left by one character width of the standard font.

continue.....

Wednesday, August 10, 2011

Symbols and Special Character in MS Word Document

Microsoft Word Allow you to enter several special characters and symbols, such as bullets, foreign charaters, mathematical symbols, curly quotes etc.You can use the symbol command in Insert menu to bring up the dialogue box show below.


Choose the font and Subset fields to locate the symbol that you want to paste at the insertion point. You can see an enlarged view of the symbol by clicking it one. Click the insert button to place the symbol in the document.

Keywords: Insert Mathematical Symbol in Microsoft Word. Insert foreign Characters in Microsoft Word, Insert Currency Sign in Microsoft Word, Insert Copyright Sign In Microsoft Word, Insert Registered, Trademark Sign In Microsoft Word.Insert Other Sign In Microsoft Word, Insert All Sign In Microsoft Word, Insert Special Characters In Microsoft Word.

Thursday, June 16, 2011

Selecting Document Views In Microsoft Office Word

The document window gives you an option to displays your documents in four different perspectives. Changing to a certain view option does not effect the document contents in any way and only shows you different layouts for your document. These options are:
Normal View
Web Layout View
Print Layout View
Outline View

You can select these options from the View Menu or by clicking their respective icons placed on the leftmost section of the horizontal scroll bar as shown in image below


Normal View
Work in normal view for typing, editing, and formatting text. Normal view shows text formatting but simplifies the layout of the layout of the page so that you can type and edit quickly.

Web Layout View
Work in web layout view when you are creating a  web page or a document that is viewed on the screen. In web layout view, you can see backgrounds, text is wrapped to fit the window, and graphics are positioned just as they are in a web browsr.

Print Layout View
Work in print layout view to see how text, graphics, and other elements will be positioned on the printed page. This view is useful for editing headers and footers, for adjusting margins, and for working with columns and drawing objects. This option gives you the exact layout of your final document. 

Outline View 
Work in outline view to look at the structure of document and to move, copy, and reorganize text by dragging headings. In outline view, you can collapse a document to see only the main headings, or you can expand it to see all headings and even body text. Outline view also makes it easy to work with 'master document'. A master document make it easier to organize and maintain a long document, such as multi part report or a book with chapters. In outline view, page boundaries, headers and footers, graphics, and backgrounds do not appear. 

Undo and Redo Command

In the Process of editing a document you will find moments when you accidentally perform an unwanted action. For such event Word gives you the choice of two commands: Undo and Redo. Word gives you three methods to undo or redo the most recent action:

1. Click the Undo button or Redo button on the standard toolbar. To undo or redo multiple actions, first click the arrow beside either the Undo or Redo button to display a list of previous actions. Then click or drag to select the action that you want to undo or redo.


2. Choose Undo or Redo from the Edit Menu.


3. Enter the shortcut Keys for Undo (Ctrl+Z) or Redo (Ctrl+Y) commands.

Certain actions cannot be undone after they are executed, such as saving or printing a document.

The Status Bar in Microsoft Office, Word

This is located at the bottom of the application window and gives information regarding the status of the document and the task you are currently performing.


Click on Image to View Large Size

The left part of the bar shows information relative to the insertion point position in the document. It display the current page number, section number and current page number followed by a slash and total number of pages in the document. The next portion shows the precise location of the insertion point, i.e., inches from the top margin, line number starting from the top most line in the page, and the column number based on the number of characters. The last section shows when certain Word modes and features are activated. For Example, When you press the insert button on the keyboard, the OVR mode is highlighted. The mode made the characters you type to replace the characters to the right of the insertion point. Double Clicking these modes can make them active and inactive.

The Scroll Bar in Microsoft Office Word

Scroll bars, like in any other program windows, help in viewing a document that takes up more space than the document window view area. This may happen if document has more than one page or the zoom size for viewing large enough. The single up and down arrow in the vertical scroll bar make the document scroll one line in the direction of the arrow as they are clicked with the mouse. The box within the scroll bar indicates the position of the insertion point to the top of the previous page, and the down one move it to the top of the next page. The icon

in the middle of the double-headed arrows is the 'Select Browser Object' Option Button. It gives you different options to place the insertion point according to the browse setting you choose. These include browse by page ( this selection is by default) , end note, footnote, section, table, graphic, headings, etc.


The Ruler in MS Word

The Horizontal ruler, as shown in image below

Click on Image to view large size

is placed across the top of the document window. It gives quick mouse access for changing paragraph indents, adjusting  margins, setting tab stops, and changing width of columns. To display or hide the ruler. click View menu and then click Ruler.


The ruler shows the available text area, indent markers and tab settings. It show any applied settings as you move the insertion point through your document.

Sunday, June 5, 2011

Microsoft Office, Word Toolbars

Toolbars are set of icons that let you access several of the most common Word commands with a click of mouse button without needing to go into any of the menus. The Standard and Formating toolbars are display just below the menu bar by default. Other toolbars can be displayed by choosing them from the toolbar submenu in the VIEW  menu list. The selected toolbar icons, like changing their size, colour, hiding tool tips, and also creating your own customized toolbar collection.

Click on Image for large size
General MS Word Toolbars

When you display other toolbars, they either appear stacked in the order you display them or float on screen like small windows. Toolbars when stacked under the Menu bar are termed as 'anchored' , and while appearing as small windows are called 'floating' toolbars.An anchor toolbar can be changed into a floating one and vice versa. To displayed. You can also double click  the background of a toolbar to change it to the background of the toolbar to change it to the floating state. To anchor a toolbar, drag it just below the menu bar or double click in the background of the toolbar or title bar.

Dialogue Boxes

A dialogue box is a small windows that opens up in the main application windows when certain command are intiated. Typically , choosing a command in a menu or a button followed by an ellipsis (....) display a dialogue box. A dialogue box offer a variety of choices related to the command that was chosen. These choices are further accessible buttons and tabs. Tabs show sets of related options and are graphically shown as file folders in the dialogue window.Checking each tab display a set of each commands that are related to the main command. This help in organizing and accessing different options related to a command.In a dialogue box, if a label for a setting, group of setting or a button is grayed out, it that that setting option is not available. Available setting setting have black text labels. After settings the different option for a command in a dialogue box, it is necessary to click OK button to apply the changes, or cancel button to exit the dialogue box without applying the settings. When inside a dialogue box, windows does not let you access any other parts of the main application window unless the open dialogue box is first closed by either choosing OK or Cancel. This inaccessibility is reminded by a short beep.

Opening Microosft Word Documents As Read-Only and As a Copy

To Open a document as a read-only or open as a copy the following steps are involved.
1. Click file menu Open or Press Ctrl+O from the keyboard or click on open icon on standard toolbar.
2. Open Dialogue box will be appear.
3. Choose the location or look in folder where the file is stored.
4. Select the name of the file from the file list or type the name of the file in file name box or Double click on file.
5. Give the type of the document in file of type box.
6. Click open Command and setting button.


7. The desired document will be open as read-only or open as a copy.

Opening Documents MS word

Here are Some General Ways for opening word documents.
From file Menu
1. Click File Menu.
2. Click Open Sub Menu.


3. Open Dialogue Box will be appear.
4. Choose the location or look in folder where the file is stored.
5. Select the name of the file from the file list or type the name of the file in file name box or Double click on file.
6. Give the type of the document in file of type box.
7. Click open button
8. The desired document will be open.

From Toolbar
1. Click open tool   on the standard toolbar.


2. Open Dialogue Box will be appear.

3. Choose the location or look in folder where the file is stored.
4. Select the name of the file from the file list or type the name of the file in file name box or Double click on file.
5. Give the type of the document in file of type box.
6. Click open button
7. The desired document will be open.

Thorough Keyboard Shortcut key
1. Press Ctrl+O from the keyboard .


2. Open Dialogue Box will be appear.
3. Choose the location or look in folder where the file is stored.
4. Select the name of the file from the file list or type the name of the file in file name box or Double click on file.
5. Give the type of the document in file of type box.
6. Click open button
7. The desired document will be open.


Friday, June 3, 2011

Saving Documents of Microsoft Word

There are different ways to save documents.
From File Menu
1.Click File Menu
2. Click Save Sub menu
3. Save As Dialogue box will be appear


4. Choose the location or give the name of the folder where you want to save
5. Type the name of file in File name box
6. Give the Type of document in save as type box
7. Click save button
8. The desired document will be save. The extension of Word document is   .DOC

From Tool Bar
1. Click Save Button on Standard Toolbar


2. Save As dialogue box will be appear
3. Choose the location or give the name of the folder where you want to save
4. Type the name of file in File name box
5.Click save button
6.The desired document will be save
 Note : If document already saved and you click on save Button on standard Toolbar then document saved on its default location where you have already saved.(In this case no dialogue box  will be appear)

Through Keyboard
1. Press Ctrl+S from the Keyboard
2. Save As dialogue box will be appear
3. Choose the location or give the name of the folder where you want to save
4. Type the name of file in File name box
5. Give the Type of document in save as type box
6. Click save button
7. The desired document will be save.
 Note : If document already saved and you press Ctrl+S from Keyboard then document saved on its default location where you have already saved.(In this case no dialogue box  will be appear)

Friday, May 20, 2011

Selecting The Text

Type the text in document page which you want.
To Select the entire word, entire sentence, entire paragraph and large area, rectangular area and partial word selection there are different ways in ms word documents.

Select an Entire Word
Double Click any where on a word you want to select. To Select adjacent words, drag after double clicking on the first word, entire word are selected when you drag this way,


Selecting An Entire Sentence
Hold down the Ctrl Key while you click any where on the sentence.This will also select the sentence's punctuation marks. Dragging after you click this way select additional sentences.

Select an Entire Paragraph
The quickest way to select the paragraph is that triple click any where on the paragraph. The entire paragraph will be select.

Selecting a Large Area
To Select a large are (Continuous block of text) there are following steps involve:

  • Put the cursor on starting point
  • Hold down shift key
  • Click on the ending point of desired area
  • Release the mouse button
  • The desired large area will be selected

Select a Rectangular Area
To select the rectangular area the following steps are involved.
  • Hold down ALT Key
  • Drag the mouse over a desired rectangular area
  • Release the mouse button & ALT Key


Creating Documents In Microsoft Word

There are Several ways to creating a new document in MS Word 2003

1. From Menu Bar
There are following steps involve to creating a new documents from th menu bar
    1. Click File Menu
    2. Click Blank Document
    3. It will Display the new blank document


2. From Tool Bar
There are following steps involve to creating a new documents from th tool bar
    1. Click on New Tool on a Standard tool bar

      
    2. It will display the new blank document

3. Through Keyboard Shortcut
There are following steps involve to creating a new documents Through Keyboard shortcut
    1.Pres Ctrl + N from the keyboard
    2. It will display the new blank document


Click on image to view large size


De-Selecting The Text

To deselected the selected text click anywhere in the document the selected text will be De-selected and appear normal form.

Sunday, May 8, 2011

Introduction to Microsoft Word Interface

The following are the components of the MS Word 2003 Interface

click on Image to View Large Size


1.Title Bar
2. Menu Bar
3. Formatting Bar
4. Standard Tool Bar
5. Table and Border Tool Bar
6. Horizontal Ruler
7. Vertical Ruler
8. Horizontal Scroll Bar
9. Vertical Scroll Bar
10. Drawing Tool Bar
11. Status Bar
12. Working Area

Word Processor

Word Process is software that helps you to create any type of written communication. A word processor can be used to manipulate data and produce  a letter, a report, a memo, or any other type of correspondence and text data.
(i.e. Microsoft Word, Word Pad, Open Office are common word processors)
But the Microsoft Word is Popular word processor.

Introduction MS Word

The most familiar application among the members of the office is word. With Word, you can accomplished all of your basic word processing duties and fulfill your desktop publishing needs. You will be using word to generate all of your memos, letters, reports and other text intensive documents.

Wednesday, April 27, 2011

How to open Microsoft Office word Program?

First of All install Microsoft office word 2003. Then Find MS word icon on desktop like this
  

Or find on Program menu from start menu like this
1. Click the start menu button in the right corner of task bar.
2. Click the All Programmes or Program submenu on the start menu
3. Click the Microsoft Office menu and then Select Microsoft Office Word Program


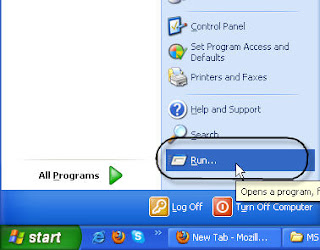
Or go to run command with short key “Windows + R” or from start menu
Click the start menu button in the right corner of task bar.
Click on the run Sub menu on the start menu.
Run Dialogue Box will be appear


Type the "Winword" or "Winword.exe" in open box
Click OK to continue


Here the Interface of Microsoft Office word 2003 when you open


The Rise of Remote Work: How it's Impacting Work-Life Balance

 In recent years, remote work has become increasingly popular among companies and employees alike. With advancements in technology and chang...